This project started way back in the Summer… ages ago. A collaboration with my stained glass friend Peter. A design and painting project that Peter thought I might quite like.
Foxgloves he said, and perhaps a wall.
Do they have wings? said I.
Haha…crack on he said, you can do it.
The client said yes to my initial doodle whilst I inwardly quaked at the sizes Peter had quoted me! (thinking, I’m going to need a considerably bigger bench!)
I sketched things bigger and we visited site and when the sheet was pinned to the walls of the clients kitchen, she said yes, yes, yes.
(Darn it – I’m going to have to see this through then).
The site visit and meet with the client was great. Now I had a feel for the location and orientation; the colour of the stone; the architecture of the building and a rough idea of likes and dislikes.
(Oh yeah, good to go now!!)
(How I overcome my fear of that huge sheet of paper?)
A friend was helpful. Take a look at Georgia O Keefe, he said, think about your lines and shapes and let the detail come later.
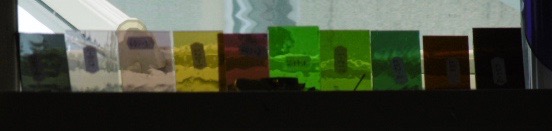
So. Fortunately, I was able to ponder and draw and redraw lines over a good length of time. I studied undergrowth. I looked closely at foxgloves. I stacked up wee chips of coloured glass in my window and so settled on a palette.


With lines refined and glass delivered I was ready to start cutting.

 This project was in fact three windows. A front door panel measuring 760W x 1065D and two sidelights measuring 400w x 1065d for an entrance in a new build house – the house being named Foxglove. The two neighboring houses, which the client had also built, were called Briar Rose and Thistledown – beautiful, said I, how about I use those blooms in the two side panels. And so that was agreed.


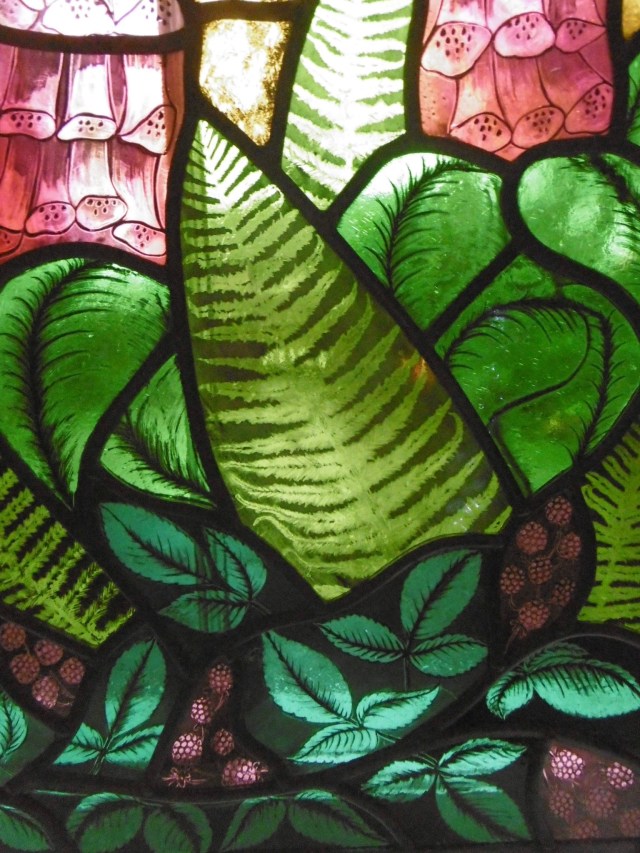
And I planned rambling brambles to scramble along the bottom of each.
So, when I started to cut I was happy to start on one of the smaller(!!) side panels (still the biggest thing I had ever done). So Briar Rose I chose to start on.

I built up the detail using layers of paint. And so the start of many, many late nights on the light box with Gideon Coe on 6 for company – happy days. Matting, scraping, scrubbing, painting and splattering until I was satisfied.


Then fire in my kiln. There were a few mistakes (aren’t there always!). The red I had selected for blackberries was too harsh so I swapped in an easier on the eye purple. Re-fire and yes, I was happy.


Next the foxgloves. Initially I used the same pink as for the roses but somehow it was too tame. I returned to that gorgeous piece of handmade pink-gold from EAG that I have been hording and stroking for ages. Perhaps its moment had arrived!
I painted two sets of samples and surprise, surprise, went for the none tame option. Beautiful, beautiful shocking pink foxgloves – a bold centerpiece statement.


The prickly thistles was the panel I was really looking forward to though. How to make some bits look untouchable and other bits light as, well, thistledown. Careful matting, scrubbing, re-matting and line that how.
Have I said I loved, really loved, painting these panels. It was so all-absorbing. Challenging and experimental and the steepest learning curve I have been on a for a while, (and, well, I do like steep hills!).
So all-fired, (some re-fired) (some clumsy breaks – doh) but then ready for leading.
I was delighted when Peter said he was happy for me to do the build. I would have been reluctant to part with all my pieces at this stage. And so, the bench extension (or elevation, in actual fact). A visit to TP’s and I built a new staged top to sit atop my trestle. Hey, it is now the perfect height. Why did I not do this years ago!


I asked advice from my friend at Pendle Stained Glass with regards strengthening and he suggested steels in the border and 8mm lead throughout. (That took some stretching I can tell you!) But it was great. The 8mm lead added strength and strong line to panels of this size. Perfect.
Leadwork. So satisfying. Thinking about which lines to flow through and where to put the joints. The don the mask and do the soldering. Nerve racking flipping these panels to solder the underside, I tell you.


Finally, the last stage, grouting and polishing. I invested in a new bristle brush (far too big a job for using fingers!) and slopped it on. Pushed it into gaps, dusted on the whiting, flipped and repeated – for all three panels. I left to firm up before scraping off the excess and polishing and polishing, and just for good measure – more polishing. A physical part of the job – tired shoulders and embarrassing fingernails.
And now they have gone. Off to the double glazers with Peter to get encapsulated into double glazed units. But not before I braved propping them in my front window and snapping a few pics.
Illumination. Wow. I’m really happy with these.
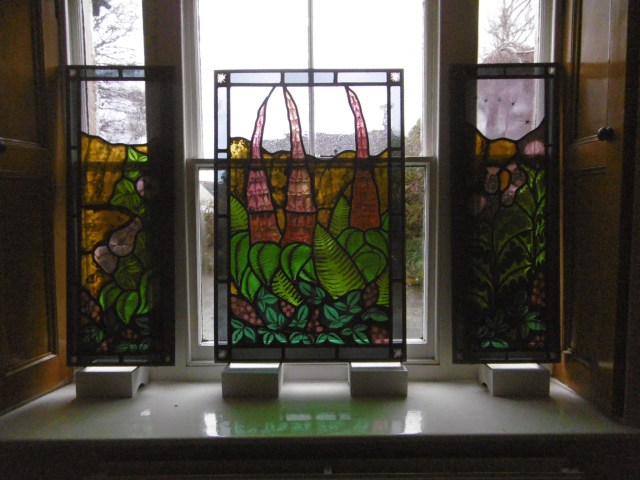


Can’t wait to see them in situ!
